Wednesday Live for Blog
Hello everyone and welcome back to Live with Fiona!
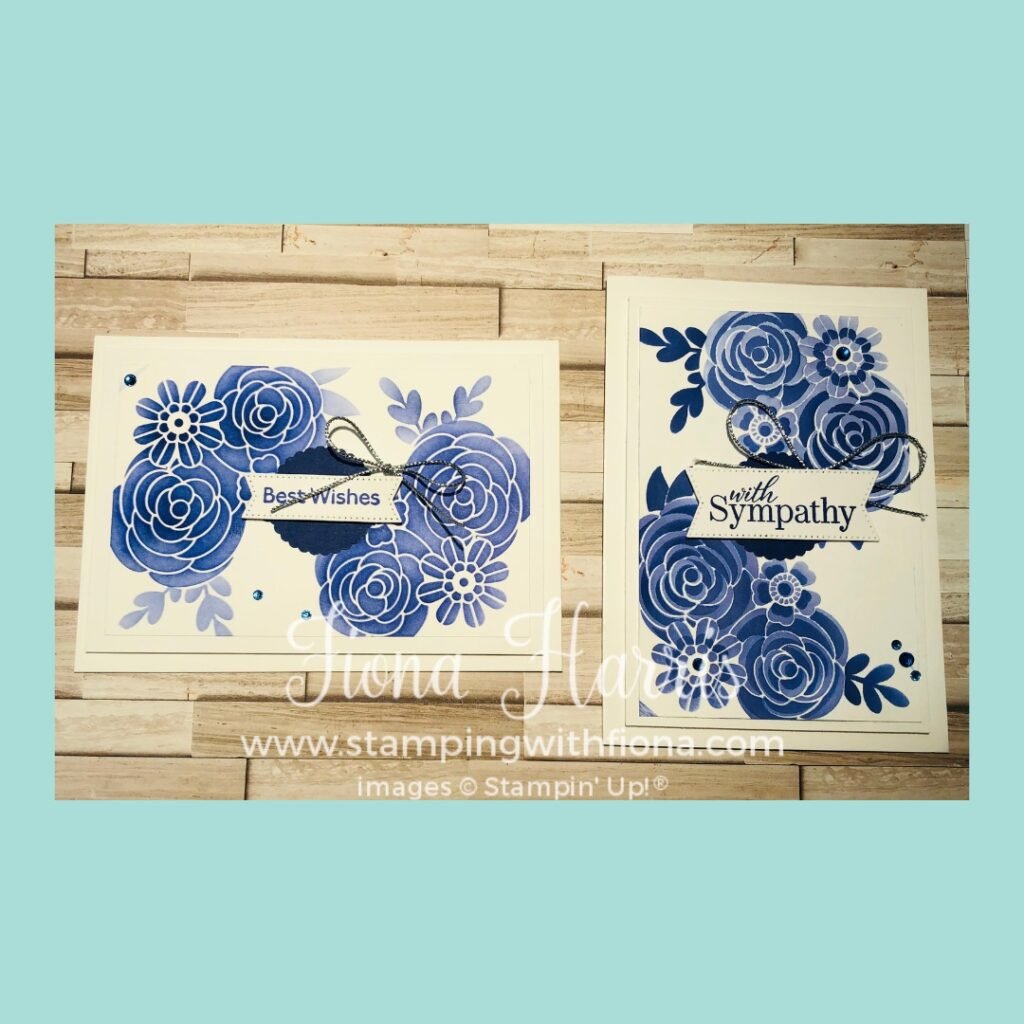
Every week, I pick a product and design projects with it and show you how to make them during a Live. This week, I’ll be using the Butterflies and Flowers Masks from the Mini January – June 2022 Catalogue. These are now on the Last Chance list as the catalogue ends on 30th June 2022 so please don’t miss out!
In case you’ve never joined me for Live with Fiona, I go live every week, typically Wednesdays at 2:00 pm BST, on my StampingwithFiona Group with the projects. Everyone is welcome to join my Group.
If you are unable to join me live, I will upload the recording here afterwards.
Remember, if you put in an order (£35 minimum) by June 6th, 2022 at midnight, I’ll send you the Make and Takes for FREE! If you’d like all of today’s Make and Takes, please make sure you use Host Code
TA3AKA72.
You will need the Butterflies and Flowers Masks, inks and Blending Brushes as well as adhesive to complete your projects. I don’t send any prestamped images per Stampin’ Up! policy.
Your order MUST be in by Monday, June 6th, 2022 at midnight! I cut everything first thing Tuesday morning and ship them typically on Wednesday morning.
You can shop in my online store here.
Supplies:
STAMPS
PAPER
Thick Basic White, Basic White. Starry Sky.
INK
Orchid Oasis, Starry Sky. Stampin’ Blends.
ADHESIVES
Stampin’ Dimensionals. Masking Paper. Glue Dote, Tampin’ Seal +.
TOOLS
Paper Trimmer, Butterflies & Flowers Layering Decorative Masks, Stylish Shapes Dies,
EMBELLISHMENTS
Rhinestones, Simply Elegant Trim.
Instructions:
Cards:
- Cut Thick Basic White card 29.6 cm x 10.5 cm and fold in half at 14.8 cm.
- Cut Basic White card 9.5 cm x 13.9 cm & 8.5 cm x 12.8 cm
- Tape down the smallest pice of Basic White card and place flowers mask over it and tape down covering any areas that you don’t want inked.
- Use a Blending Brush to add ink over the mask.
- Remove mask and replace with detailed flower and ink over the top.
- Glue the layers to each other and then to the card base.
- Stamp sentiment and die cut label with Stylish Shapes die.
- Die cut a small circle in Starry Sky card and glue to card front, add sentiment label with Dimensionals.
- Glue stamped images to larger piece of Basic White and add to card front using Dimensionals.
- Tie a bow in silver Simply Elegant Trim and add to side of sentiment using Glue dot.
Thank you for joining me. It would really help my small business if you could share my posts and videos and I would love you to Subscribe to my You Tube Channel.
Fiona xx