Friday With Fiona – Snowflake Speciality Vellum
Hello everyone and welcome back to Friday with Fiona! Every week, I pick a product and design projects with it and show you how to make them during a Live. This week, I’ll be using the Celebrate with Tags Stamp and Dies and gorgeous Snowflake Speciality Vellum.
In case you’ve never joined me for Friday with Fiona, I go live every week, typically Fridays at 2:30 pm BST, on my StampingwithFiona Group with the projects. Everyone is welcome to join my Group.
Remember, if you put in an order (£35 minimum) by October 4th 2022 at midnight, I’ll send you the Make and Takes for FREE! (Enough to make 3 cards and 3 mini bags). If you’d like today’s Make and Takes, please make sure you use Host Code P7NZSY2J.
You will need: ink, cardstock, trimmer and adhesive to complete your projects.
If you are unable to join me live, I will upload the recording here afterwards.
Your order MUST be in by Tuesday, October 4th 2022 at midnight! I cut everything first thing Wednesday morning and ship them typically on Thursday morning.
Free Make and Takes Host Code P7NZSY2J
You can shop in my online store here.
Supplies:
STAMPS: Celebrate with Tags
PAPER: Bermuda Bay or Polished Pink, Basic White, Snowflake Speciality Vellum.
INK: Bermuda Bay or Polished Pink
ADHESIVES: Stampin’ Dimensionals, Stampin Seal. Tombow.
TOOLS: Celebrate with Tags Dies, Fancy Frames Dies, Trimmer, Stampin’ Cut and Emboss machine,
EMBELLISHMENTS:. Wonderful Snowflakes
Instructions:
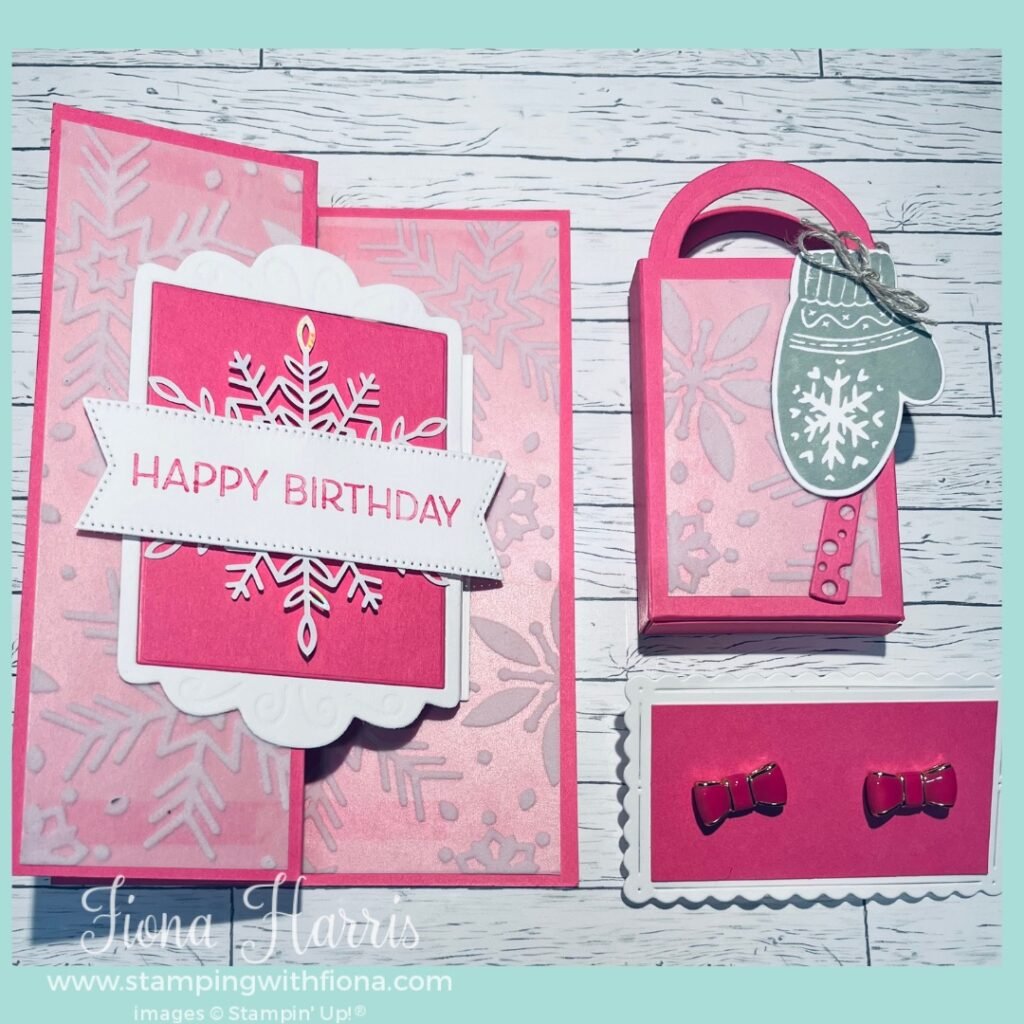
Card:
- Cut Bermuda Bay or Polished Pink card 21cm x 14.8 cm and score in half at 10.5 cm, the score the front in half again at 5.25.
- Cut a piece of Snowflake Vellum 10 cm x 14.3 cm and glue to the inside of the card.
- Cut a piece of Snowflake Vellum 10 cm x 14.3 cm and glue to the front flap.
- Die cut a frame using Fancy Frames dies in Basic White, and a piece of coordinating card 6.5 cm x 8cm. Glue the frame to the front flap of the card.
- Glue the Basic White from the middle of the frame to the inside of the card for your message.
- Glue a Wonderful Snowflake to the centre of the frame using a Stampin’ Dimensional
- Stamp Happy Birthday and die cut using Stylish Shapes banner. Glue across the middle of the Wonderful Snowflake using Stampin’ Dimensionals.
Mini Gift Bag:
- Cut a piece of coordinating card 14 cm x 8.8 cm.
- Score on the long side at 1.3 cm, 6.4 cm, 7.7 cm, 12.7 cm.
- Score on the short side at 1.3 cm.
- Cut the short score lines and fold and glue to make the bottom of the bag.
- Die cut two Layering Circles (x2) to make the handles (2nd and 4th smallest circles).
- Glue the bottom half of the handle inside each side of the mini bag.
- Cut Snowflake Vellum 4.5 cm x 7 cm and glue to the front of the bag.
- Stamp a Mitten from Celebrate with Tags, die cut mitten and a candle.
- Punch a small hole in the wrist of the mitten and attach to handles with Linen Thread.
- Glue candle to front of bag.
Thank you for joining me – I would love to send you details of my classes so please sign up for my emails, https://stampingwithfiona.com/blog/ and it would help my small business if you Subscribe to my You Tube channel
Thank You!