Friday With Fiona
Hello everyone and welcome back to Friday with Fiona!
Every week, I pick a product and design projects with it and show you how to make them during a Live. This week, I’ll be using the Symbols of Fortune Designer Series Paper.
In case you’ve never joined me for Friday with Fiona, I go live every week, typically Fridays at 2:00 pm BST, on my StampingwithFiona Group with the projects. Everyone is welcome to join my Group.
If you are unable to join me live, I will upload the recording here afterwards.
Remember, if you put in an order (£35 minimum) by May 23rd, 2022 at midnight, I’ll send you the Make and Takes for FREE! If you’d like all three of today’s Make and Takes, please make sure you use Host Code TA3AKA72.
You will need: cardstock, Designer Series Paper and adhesive to complete you projects. Your order MUST be in by Monday, May 23rd, 2022 at midnight! I cut everything first thing Tuesday morning and ship them typically on Wednesday morning.
Free Make and Takes Host Code TA3AKA72
You can order these products in Fiona’s online store in UK.
Supplies:
STAMPS
Go To Greetings158763
PAPER
Basic White 159228, Evening Evergreen 155575, Soft Succulent 155777, Balmy Blue 147007, Symbols of Fortune Designer Series Paper 157652.
INK
Evening Evergreen Stampin’ Write Marker 155639,
ADHESIVES
Stampin” Seal 152813, Tombow 154974, Stampin’ Dimensionals 104430.
TOOLS
Paper Trimmer 152392,
EMBELLISHMENTS
Faux Sea Glass Shapes 158139
Directions:
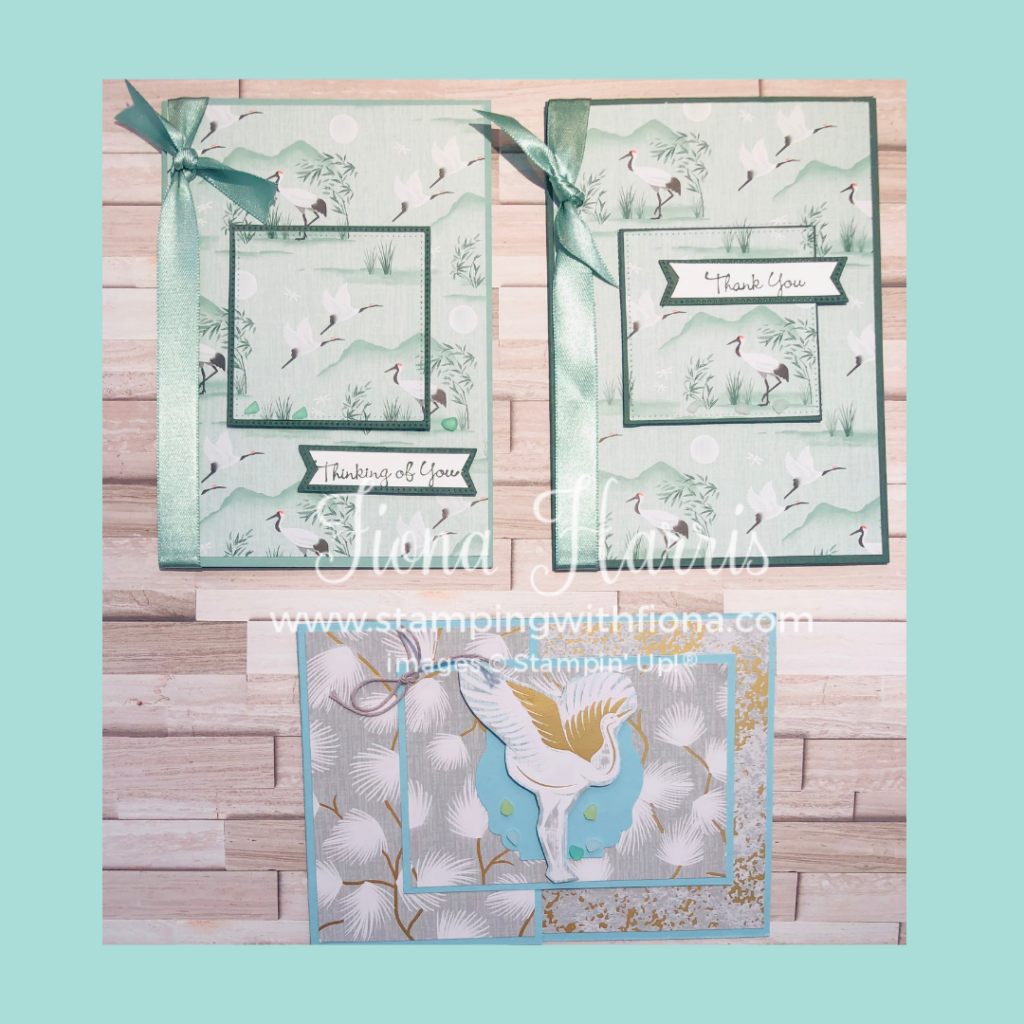
Card#1
- Cut Soft Succulent card 21 cm x 14.8 cm and fold in half at 10.5 cm.
- Cut Designer Series Paper 10 cm x 14.3 cm and die cut a Stitched Square using Stylish Shapes dies from the middle.
- Cut a larger square in Evening Evergreen card 10.2 cm x 14.5 cm and glue the DSP square to it.
- Wrap the ribbon around the inside of the card and tie a knot at the top of the card.
- Stamp sentiment onto Basic White rectangle glue to a die cut a label in Evening Evergreen.
- Add Faux Sea Glass Shapes.
Card#2
Repeat Card #1 using Evening Evergreen card.
Card#3
- Cut Balmy Blue card 29.6 cm x 10.5 cm and fold in half at 14.8 cm, and cut the front at 7.4 cm.
- Cut Designer Series Paper 6.9 cm x 10 cm and a second piece 10 cm x 6.9 cm (be careful if using directional paper), and a complimentary piece 10 cm x 14.3 cm for inside.Glue to cardbase.
- Cut Basic White card 6.9 x 10 cm for the inset and glue inside.
- Fussy cut an image of your choice – I used the Crane.
- Punch a Label Me Lovely in Balmy Blue and glue to card front, add Crane using Stampin’ Dimensionals.
Thank you for supporting my small business, it would really help me grow if you Subscribe to my You Tube channel.
Fiona x